Remember the Binary Runes I was working on for one of my Nevermet Press submissions? I used fontcapture.com to turn it into a TrueType file.
The resolution in the final product was not quite as precise as I'd hoped, so I had to remove the binary aspect from the upright portion of the characters, as it came out rather 'blobby.' Still, I think it works rather nicely without it:
Just download it and drop it into your Windows/Fonts folder (Mac OS X: Double-click on the downloaded font file, then click Install Font.)
Dwarven Runes Font (14.34 KB, Mediafire)
This font is 100% free and my Christmas gift to you. I just ask that you give credit where it's due - of course, any and all donations will be greatly appreciated and go towards producing more and better material.
Enjoy!
Tuesday, December 22, 2009

Thursday, December 17, 2009
Art: DC Comics Guide to Digitally Drawing Comics Review
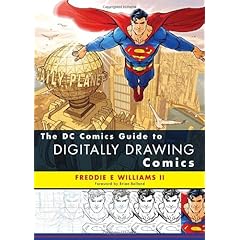 My art library is relatively small, but steadily growing. I have found that the books I end up with tend to fall into one of two categories: inspirational and instructional.
The inspirational books are primarily collections of art work, though some 'how to' books will fall under this category if I'm kinda into the art, but don't really get anything new or worthwhile from the text. Usually, I'll look through them, taking a mental inventory of what kind of art is to be found, and set them aside until I need a specific type of inspiration. They cover a variety of artistic styles and subject matter, and are themselves subjective to the kind of inspiration they provide.
Lately, though, what I've tried to focus on getting are books of a more technical or instructional nature - titles such as: Scott McCloud's Making Comics, James Gurney's Imaginative Realism, Vol. 1 of the Best of Wizard's How to Draw series, and pretty much anything by Andrew Loomis.
These books go in depth with the processes and methodology of artists I respect and admire. I am happy to add to this list The DC Comics Guide to Digitally Drawing Comics, by Freddie Williams II.
I should make clear, though, that it's not Mr. Williams' style I am such a fan of - despite his obvious ability and DC's stamp of approval. What intrigues me most about his work is his process, and that is the main focus of this book. FWII (if I may be so bold . . . and lazy) does his work entirely in Photoshop.
His process basically breaks down into the following steps:
- Load the script for a page and make very rough gestureal sketches for each panel beside the descriptions.
- Move/resize the roughs into panels and develop them further on a new layer.
- Make thin 'wireframe' inks for each panel - sans any sort of lighting or texture. Strictly structural and provides a groundwork for inking.
- Make outlines (contours) of the foreground elements in each panel.
- Turn the contours into "cardboard cutouts" that can be repositioned as needed, but block background elements.
- Ink and drop in black areas.
Another section I found fascinating (simply because I'd never thought of it before) was on making paths of complex background elements, such as building facades and chest emblems, which could then be stored, reused, and distorted to meet the artists' needs. FWII also makes use of Google Sketchup to build entire cityscapes for his scenes. Since I like playing around with Sketchup, I found this to be a pretty cool idea.
On the downside, if you are at all familiar with Photoshop, at least one or two chapters of the book will be going over the same information about the program that this topic always seems obligated to address. Also, there was some background information about the author and the evolution of his process that was mildly interesting, but certainly not what I was after when I decided to get the book.
Overall, I am very happy I got this book, having devoured it in its entirety in less than half the time it took for my laptop to upgrade Windows 7. I would recommend it to anyone interested in producing comic-style artwork and looking to make at least some part of the process digital.
One last tidbit: I have read, to some extent or other, all of the "DC Comics Guide to" series, and this is the first one I felt compelled to buy.
Monday, December 7, 2009
DnD, Art: Portrait of a Villain - The Desire; On Sale Now!
I am happy to announce that Nevermet Press - the online collaborative group I have been working with for several months now - has released it's first collection of articles in its Portrait of a Villain Series!
To mark the occasion, here are a couple of illustrations I contributed to the project, in addition to some written content, two encounter maps, and the Highcourt Map featured on this blog a couple of posts back:

In this eBook, you will find the complete back story to Desiree Turpis, also known as The Desire, a calculating Madame who manipulates local nobles and crime lords to serve her own needs.
It is fully-compatible with 4th Edition Dungeons & Dragons.
Along with The Desire's own back story, adventure hooks, goals and motivations, you will also find:
- Three fully developed, drop-in encounters featuring The Desire
- Four new organizations to help create a rich campaign setting, complete with stats for each organization's leader and minions
- The Objects of Desire; a collection of new magical masks for 4E
- The Sword Sisters; a new 4E Paragon Path for PCs bent on revenge
- Highcourt, City on the Edge; a fully developed microsetting to help get things started (includes full color map)
- The Ceremony, a short story where The Desire assassinates a local noble.
All this and dozens of high quality illustrations and maps, over 30 new allies and enemies all for 4th Edition Dungeons & Dragons.
Nevermet Press eBooks offer the following added features:
- TWO PDFs in each purchase. The main PDF is brilliant full color landscape, 3-column layout for EASY screen reading. The second PDF is a FREE B&W printer friendly version that includes a portrait 2-column layout, reduced graphics, and wider left margin. The result is a PDF that is easy on your ink/toner and ready to hole punched for your notebook.
- Interlinked PDFs with bookmarks and links to www.nevermetpress.com
- Full color, beautiful illustrations and maps.
To mark the occasion, here are a couple of illustrations I contributed to the project, in addition to some written content, two encounter maps, and the Highcourt Map featured on this blog a couple of posts back:


Friday, December 4, 2009
DnD: Call for Submissions - Open Game Table II
Howdy! Hope everyone had a nice Thanksgiving- or ideologically equivalent - holiday. I've been ridiculously busy with projects that (hopefully) I'll get to post more about soon. Until then, I have an announcement for all the DnD/RPG readers:
Jonathan Jacobs, mastermind behind The Core Mechanic and one of the founders of Nevermet Press has announced the second volume of the popular Open Game Table for a Summer 2010 release. It will be released simultaneously as an eBook and with retail print distribution via Studio 2 Publishing.
As was done for Volume 1 - the creation of the manuscript is preceeded by two important steps:
The submission deadline for nominations of blog posts closes January 15th, 2010. The submission process has been streamlined so that all you need to submit is a valid URL. Up to 5 submissions per form can be accommodated; but there's no limit to how many forms you can send in. The nomination form, and more information, can be found here:
Jonathan Jacobs, mastermind behind The Core Mechanic and one of the founders of Nevermet Press has announced the second volume of the popular Open Game Table for a Summer 2010 release. It will be released simultaneously as an eBook and with retail print distribution via Studio 2 Publishing.
As was done for Volume 1 - the creation of the manuscript is preceeded by two important steps:
1) the assembly of an independent peer review panel (bloggers, game designers, developers, artists, fans all welcome)
2) the recieving of blog post nominations.
The application period for being a peer reviewers closes December 31st, 2009. These individuals will be responsible for reading the entries (not all of them, word count will be spread around) and interacting with Jonathan during the final decision making process. If chosen, your names will be withheld until publication of the book. If you are interested, follow the link for more information and to submit your information:
The submission deadline for nominations of blog posts closes January 15th, 2010. The submission process has been streamlined so that all you need to submit is a valid URL. Up to 5 submissions per form can be accommodated; but there's no limit to how many forms you can send in. The nomination form, and more information, can be found here:
http://rpganthology.wufoo.com/forms/open-game-table-vol-2-blog-post-nomination-form/
I thinking of submitting some stuff, myself - maybe I'll see your stuff there, too!
I thinking of submitting some stuff, myself - maybe I'll see your stuff there, too!
Friday, November 20, 2009
Art, Dnd: Highcourt Map for NMP
Well, I had intended to do another 40K Battle Report for a game I had last Thursday, but I honestly don't feel like writing it up. So, instead, I'll give you something much more aesthetically appealing (I hope) than a bunch of crappy cell phone pics.
 This is a map I made of Highcourt, the setting for Nevermet Press' first .pdf that should go on sale soon. It's the first time I done a map like this, but I look forward to further developing my own variation the process I emulated to produce this piece.
At last count, I think the .pdf going to be 50(!) pages of rockin' content that you can use for/in your RPG campaigns - and that's all based around a single villain/setting. We've got a LOT more coming down the pipe, with plans to produce a printed collection.
I'd be lying if I said I wasn't excited about it.
Sunday, November 15, 2009
40K: Experimenting with Space Hulk Doors
Fear not faithful reader(s?), I have not forsaken the blog! After a rather hectic week and a half, I finally got around to getting a new post together.
The Space Hulk door bases are great for practicing new painting techniques on. Particularly, I wanted to make them look old and rusty - a technique I plan to apply to my Orks, once perfected.
Step 1 (not pictured): Undercoat of Chaos Black (sprayed on)
Step 2: Flat coat of Boltgun Metal
Step 3: Scorched Brown on the sides, corners and recesses - basically anywhere that does not get as much foot traffic on it.
 Step 4: Tin Bitz over the Scorched Brown. Don't worry about an even coat or leaving some of the Brown peeking out in places - it's supposed to old and rundown.
 Step 5: Here is where the experimentation really come in to play. Not sure which wash would produce the best effect, I tried three: Flesh Wash, Thraka Green, Badab Black. The washes were liberally applied all over the base. In the case of the Flesh Wash, I probably could have done with a little less.
 Step 6: After the washes dried, I drybrushed some Boltgun Metal over the base - being mindful to give the more heavily trafficked areas extra attention.
 And that is pretty much all there is to it! I put some doors in the bases to see how they looked.
 Surprisingly, I discovered that I only had one green door for the whole set, so I probably won't be using Thraka Green on any of the other steps. The Flesh Wash looked good, but was a little too brownish/orange in the final product for an ideal match to the doors - though the yellow doors helped bring it together some. The Badab Black came out the closest to the color of the metal printed on the cards.
For some added immersion, I'm toying with the idea of making plasticard door frames - without the doors in them - that would fit in the bases and represent open doors. But I've got a loooong list of things to finish before I get around to that.
The Space Hulk door bases are great for practicing new painting techniques on. Particularly, I wanted to make them look old and rusty - a technique I plan to apply to my Orks, once perfected.
Step 1 (not pictured): Undercoat of Chaos Black (sprayed on)
Step 2: Flat coat of Boltgun Metal
Step 3: Scorched Brown on the sides, corners and recesses - basically anywhere that does not get as much foot traffic on it.
Step 4: Tin Bitz over the Scorched Brown. Don't worry about an even coat or leaving some of the Brown peeking out in places - it's supposed to old and rundown.Step 5: Here is where the experimentation really come in to play. Not sure which wash would produce the best effect, I tried three: Flesh Wash, Thraka Green, Badab Black. The washes were liberally applied all over the base. In the case of the Flesh Wash, I probably could have done with a little less. Step 6: After the washes dried, I drybrushed some Boltgun Metal over the base - being mindful to give the more heavily trafficked areas extra attention.
 And that is pretty much all there is to it! I put some doors in the bases to see how they looked.
  Surprisingly, I discovered that I only had one green door for the whole set, so I probably won't be using Thraka Green on any of the other steps. The Flesh Wash looked good, but was a little too brownish/orange in the final product for an ideal match to the doors - though the yellow doors helped bring it together some. The Badab Black came out the closest to the color of the metal printed on the cards.
For some added immersion, I'm toying with the idea of making plasticard door frames - without the doors in them - that would fit in the bases and represent open doors. But I've got a loooong list of things to finish before I get around to that.
Tuesday, November 3, 2009
DnD: Encounter Quick Reference Sheet
I finally finished (the version of) the Encounter Quick Reference Sheet, which was developed to help make encounter building a little easier:
Download it here (1.94 MB .pdf, Mediafire)
My plans for the future involve redesigning the Monster Card Template, Player Reference Sheet, and the mysterious Group Tracking Sheet to be more printer-friendly and combing them, along with this sheet and the Skill Challenge Tracker into a comprehensive "DM kit" that can be used digitally or as a print out.
Sunday, November 1, 2009
Misc: A Clockwork Pumpkin
A few years back, some friends of ours started throwing an annual pumpkin carving party. A bunch of our friends would come together, have dinner and carve pumpkins (pretty self-explanatory, really).
Not being content with using the same cookie-cutter patterns that you'd see at just about every house in the neighboorhood, I made it a point to always use my own design - even if it wasn't quite as polished.
What you see below was decided upon, drawn out and carved (using one of those fake pumpkins from Michaels') in about 2.5 hours.


Meh.
Wednesday, October 28, 2009
Misc: NOT An Apology
As happens from even the most prolific of bloggers, sometimes real life asserts itself and the time between posts grows longer and longer. So I have decided to list out everything I am, have been, and plan to be working on. Such a list, it is my hope, will help me to get my goals and priorities organized so I can get around to actually wrapping some of this stuff up. Many of these will eventually find their way onto this blog - when I find the time, of course.
Recently finished
It's not likely, but one can hope . . .
Recently finished
- Freelance work: building a website for Rebuild Sudan a non-profit organization aimed at improving the quality of life for children and families who have suffered through war.
- DnD: Three articles for a future Nevermet Press villain
- 40k: Doing some modeling work on my Dark Eldar Ravagers & taking pictures for a post
- DnD/Art: My first-ever campaign-style map for Nevermet Press' first-ever PDF release.
- Dnd/Art: Another digital painting for one of my Nevermet Press villains: The Automated Antagonist
- 40k: Doing an experiment in painting the door bases from Space Hulk
while slowly painting the Marines and prepping the Genestealers for primer - Misc/DnD: Getting a Google Wave account (finally caved - I want in)
- Freelance: Finish the much-needed redesign for my personal website (Kingworks Creative)
- DnD/Art: Get the Binary Runes turned into a font.
- DnD: Finish the Encounter Quick Reference Sheet.
- Art: My super-ultra-top-secret graphic novel (1/2 way written; but I'm thinking of a rewrite)
- 40k: Warhammer 40k Flash Game
- 40k: Renovating some of my 40k terrain
- 40k: Finish modeling/painting Ork, Blood Angel, and Tyranid armies
It's not likely, but one can hope . . .
Tuesday, October 20, 2009
40K: Battle Report - 1500 pt Dark Eldar vs Dark Eldar
I have often encountered players who, upon learning that I play DE, say something along the lines of "Yeah, I used to play them." I was surprised to find that someone at my LGS actually show up with his DE, looking for a game. I was more than happy to oblige.
We rolled for a mission and wound up competing for four objectives - one located in each quadrant of the table.
Kabal of the Guilded Talon (my list)
1 Archon (HQ)
- Punisher; Shadow Field; Drugs; P.Grenades; Animus Vitae; Tormentor Helm
6 Incubi Retinue
- Torm. Hl. & Punisher (x5); Blaster (x1); Plasma Grenades
1 Raider
- Dark Lance
9 Wyches (Elites)
- Splinter P. & CCW (x8); Blaster (x1); P.Grenades; Wych Weapons
1 Succubus
- Agoniser (x1); Splinter Pistol (x1); P.Grenades; Wych Weapons
1 Raider
- Dark Lance
1 Raider Squad (Troops)
5 Warriors:
- Splinter Rifle (x3); Splinter Cannon (x1); Blaster (x1)
1 Raider
- Dark Lance; Horrorfex
14 Warriors (Troops)
- Splinter Rifle (x10); Splinter Cannon (x2); Blaster (x2)
10 Warriors (Troops)
- Splinter Rifle (x8); Dark Lance (x2)
10 Warriors (Troops)
- Splinter Rifle (x8); Dark Lance (x2)
3 Reaver Jetbikes (Fast Attack)
- Splinter Rifle (x1); Blaster (x2)
3 Ravagers (Heavy Support)
- Dark Lance (x1); Disintegrator (x2)
Models in Army: 65
Total Army Cost: 1500
My opponent's list, as near as I remember:
1 Archon (HQ)
- Agonizer; Shadow Field; Drugs; P.Grenades; H.Grenades
10 Incubi Retinue
- Torm. Hl. & Punisher (x10); P.Grenades
1 Raider
- Dark Lance; Horrorfex
1 Dracon (HQ)
Agonizer
Combat Drugs
Plasma Grenades
Haywire Grenades
10 Incubi Retinue
Torm. Hl. & Punisher (x10); Plasma Grenades
1 Raider
Dark Lance; Horrorfex
3 Raider Squads (Troops)
Warriors
- Splinter Rifle (x3); Splinter Cannon (x1); Blaster (x1)
1 Raider
- Dark Lance; Horrorfex
1 Ravager (Heavy Support)
- Disintegrator (x3)
2 Talos (Heavy Support)
Deployment
I won the roll for deployment and opted to go first, I deployed towards the middle of my DZ, placing Sniper Squad 1 near an objective in a forested hill on my left and Sniper Squad 2 near an objective on a large plateau on the right. Between them sat the Warrior Squad. The Archon and RJB unit were deployed behind Sniper Squad 1's hill. Ravager 1 was at the rearward base of the hill, between Sniper Squad 1 and the Warrior Squad, while Ravager 2 was located behind the large hill that Sniper Squad 2 occupied, along with the Wych Raider and the Raider Squad. The last Ravager was placed on my right flank, behind a building
My opponent placed his entire force behind a forested hill in the center of his DZ, flanked by the Talos with 2 Raider Squads blocking line of sight to the other Raiders and Ravager packed in behind them.
My Turn 1
Moving
The RJB's boosted along the extreme left flank, ending their move behind a forested hill. The Warrior Squad moved forward cautiously, backed up by Ravager 1 which moved up 12". Ravager 2 moved forward 12" to hover in front of Sniper Squad 2 on their hill, while Ravager 3 moved forward 6" out from behind the building. The Raider Squad moved up 12", heading for the nearest objective, located in front of my opponent's DZ. Both Sniper Squads sat still, as did the Archon and Wych Raiders.
Shooting
Despite the full complement of Dark Lance, Heavy and Light Disentegrator fire poured into the mass of enemy Raiders, I only managed to down a single Raider; The Dracon Raider was shaken, his lone Ravager was stunned, and a single wound was taken off the Talos that was lined up against my left flank. The Warriors waited until the Raider was downed to open up on the pinned enemy Warriors, killing several with their Splinter Cannons.
Assault
No assaults this turn, but the RJB adjusted their position along the left flank.
Opponent's Turn 1
Moving
The foremost Raider on his right side moved across his deployment to provide cover for the pinned Warriors. The other vehicles that could still move inched forward, but seemed hesitant. A second Raiders on [his right, my left] was destroyed by a scattering blast from a Disentegrator, killing almost half the Warrior squad on board. The two Taloi surged forward, but rolled poorly in their attempts to fleet/run.
Shooting
The enemy's return fire downed my Raider Squad with a lance shot (note the flaming wreckage template in front of Sniper Squad 2's hill), and the survivors were quickly picked off. Another lance to Ravager 1 (Between Warrior Squad and Sniper Squad 1) disabled its dark lance. The rest of his shooting was largely ineffectual.
Assault
No assaults
My Turn 2
Moving
The RJB's move to the small hill near the objective and leftmost enemy Talos. Ravager 1 and the Warrior squad stay put, having plenty of targets in range. The other two Ravagers move forward 6". The Archon's Raider moves 12" over Sniper Squad 1's hill and sit on the objective just outside my DZ. The Wych Raider shifts out from behind cover to draw a bead on the rightmost Talos with its lance. The Sniper Squads maintain their positions.
Shooting
Not a great round of shooting, due in large part to my opponent's ability to make a ridiculous number of cover saves. The RJB's are somehow just outside of Blaster range and can't fire on the nearby Talos. Additionally, only one of the many lance shots in its direction managed to score a second wound - proving it's worth a fire magnet. Some other shooting from on the opposite side of the field managed to stun a Raider while the Warrior Squad picked off a few more of the downed Warriors from the first turn. Talos 2 takes a wound.
Assault
No assaults, but the RJB's advanced upon the Talos, putting them within the threat of assault - depending on my opponent's fleet/run roll.
Opponent's Turn 2
Moving
The Talos takes the bait and moves over difficult terrain, headed for the RJB's. The Warriors move up to support it, taking them closer to the objective in that quadrant. The Archon's Red Raider zooms forward 12" with the Ravager following close by. The second Talos moves up on the my right flank Ravager. The Dracon's Raider finally decides to move up opposite the Archon, while the remaining Raider continues to meander around the wreckage of the Raider from turn 1, as the survivors move into cover around the nearby objective.
Shooting
His Ravager manages to immobilize Ravager 1 beside the Warrior Squad, leaving it with two functional Disentegrators. A volley of lances annihilates Ravager 3 along my right flank. A few more Warriors are picked off from the middle.
Assault
Talos 1 reaches assault with and kills two of the RJB's, leaving the lone survivor to flees back towards his table edge as it consolidates towards the downed Ravager 1. Talos 2 assaults Ravager 2, but only succeeds in shaking it.
My Turn 3
Moving
The Archon's Raider moves up behind Talos 1, roughly where the RJB's made their stand. The Wych Raider moves up to the edge of the hill where the enemy Warriors are holding an objective and disembarks. Ravager 2 retreats from Talos 2, taking up a position behind the Warrior squad.
Shooting
Talos 1 is largely ignored, while shots are poured into Talos 2, only managing to score a second wound on it. The Wyches thin out the Warrior squad holding the objective with their Splinter Pistols and Blaster. Fortunately, the Archon's Raider is taken down and a few casualties a taken in the unit. Unfortunately, my opponent continues to make the majority of his cover and armor saves.
Assault
The Wyches assault the remainder of the Warrior squad, using their Plasma Grenades to negate their cover. The Warriors are slaughtered and the Wyches consolidate into cover around the objective.
Opponent's Turn 3
Moving
The remaining Raider with its squad of Warriors move up to unleash splintery heck on the Wyches. Talos 1 creeps 6" towards the downed Ravager 1. The Dracon's Raider dashes across the center of the table, as the Archon and his retinue slog across on foot. Talos 2 remains in contact with the shaken Ravager 3. The enemy Ravager falls back to cover the Warriors who are holding an objective and staring down the Archon's Raider.
Shooting
My Warrior squad is nearly cut in half by shooting, mainly from the Ravager. The Raider Squad pours fire into the Wyches, but cover saves prevent them from being wiped out entirely. My Archon's Raider is stunned, but otherwise unharmed.
Assault
The opposing Archon and Incubi charge the remnant of the Warrior squad and crush it - leaving a lone survivor scrambling for a table edge. They consolidate towards the forest where Sniper Squad 1 is hiding. Talos 2 attempts to destroyRavager 2, but can't seem to connect.
My Turn 4
Moving
Sniper Squad 1 surges forward to claim the objective sitting just forward of the forested hill they've been hiding in while Sniper Squad 2 rushes forward to surround the objective in front of them. The Archon's Raider slides on to the small hill beside it before disembarking. Ravager 2 continues to make a tactical withdrawl, ending up in nearly the same position it started the game. The Wyches shift around in the cover, anticipating that they will either charge this turn or be wiped out by shooting shortly after, while their Raider maneuvers deep into enemy territory and flanks the Ravager. The fleeing RJB and Warrior continue their headlong flight off the table.
Shooting
Finally getting our targeting matrices aligned, Talos 2 is taken down by lance fire. The Wyches also manage to take down the Raider closest to them with a Blaster, taking some Warriors out in the ensuing wreck (and pinning them, I think) - My opponent attempts to deploys them on the opposite side of the wreckage from the Wyches. The Wych Raider sends a beam of dark matter into the rear of the enemy Ravager, stunning it. Ravager 2 lays waste to the Archon and his Incubi with its Disentegrators, but can't quite wipe them out.
Assault
My Archon and his Incubi charge and make short work of the Warriors holding an objective. They consolidate around the objective.
Opponent's Turn 4
Moving
The Dracon and his Incubi disembark at the foot of the hill by Sniper Squad 2. The Archon and a surviving Incubi (or two), attempt to move into the forest towards Sniper Squad 1, but poor difficult terrain tests frustrate their movement. Talos 1 casually floats up to the immobilized Ravager 1, claws twitching greedily.
Shooting
The Dracon and her retinue take pot shots at Sniper Squad 2 while her Raider blows Ravager 2 out of the sky.
Assault
The Dracon and Incubi charge Sniper Squad 2, slaughtering most of the them, but the survivors refuse to back down. Talos 1 wails on the Ravager 1, but can't seem to do anything to it that hasn't already been done.
 End of Turn 4.
Somewhere around this point, another player made the smart alec comment:
"Hey the DE are finally going to win a game!"
I gave him the stink eye.
My Turn 5
Moving
The Wyches move out of cover to face the Warriors hiding behind their downed Raider.
Shooting
Sniper Squad 1 finally FINALLY takes down Talos 1. The Splinter Pistols and a Blaster of the Wyches trim the ranks of the Warriors. A couple shots aimed at the Ravager keep it unable to fire, IIRC - that or the Archon's Raider blew up the Dracon's Raider (I really need to remember to get the end game pics)
Assault
The Wyches charge and overrun the Warriors contesting the objective - they consolidate towards the Dracon and Incubi, who finishes off Sniper Squad 2 and consolidates around the objective.
Opponent's Turn 5
Moving
The Archon and Incubi try to move through the forest, but can't get within striking distance of Sniper Squad 1 - the only scoring unit left on the table.
Shooting
n/a
Assault
n/a
At this point, my opponent rolled to see if the game would continue and got a 1. I was firmly in possession of 1 objective, and contesting 2 others. My opponent was contesting 1 objective. I win!
We rolled for a mission and wound up competing for four objectives - one located in each quadrant of the table.
Kabal of the Guilded Talon (my list)
1 Archon (HQ)
- Punisher; Shadow Field; Drugs; P.Grenades; Animus Vitae; Tormentor Helm
6 Incubi Retinue
- Torm. Hl. & Punisher (x5); Blaster (x1); Plasma Grenades
1 Raider
- Dark Lance
9 Wyches (Elites)
- Splinter P. & CCW (x8); Blaster (x1); P.Grenades; Wych Weapons
1 Succubus
- Agoniser (x1); Splinter Pistol (x1); P.Grenades; Wych Weapons
1 Raider
- Dark Lance
1 Raider Squad (Troops)
5 Warriors:
- Splinter Rifle (x3); Splinter Cannon (x1); Blaster (x1)
1 Raider
- Dark Lance; Horrorfex
14 Warriors (Troops)
- Splinter Rifle (x10); Splinter Cannon (x2); Blaster (x2)
10 Warriors (Troops)
- Splinter Rifle (x8); Dark Lance (x2)
10 Warriors (Troops)
- Splinter Rifle (x8); Dark Lance (x2)
3 Reaver Jetbikes (Fast Attack)
- Splinter Rifle (x1); Blaster (x2)
3 Ravagers (Heavy Support)
- Dark Lance (x1); Disintegrator (x2)
Models in Army: 65
Total Army Cost: 1500
My opponent's list, as near as I remember:
1 Archon (HQ)
- Agonizer; Shadow Field; Drugs; P.Grenades; H.Grenades
10 Incubi Retinue
- Torm. Hl. & Punisher (x10); P.Grenades
1 Raider
- Dark Lance; Horrorfex
1 Dracon (HQ)
Agonizer
Combat Drugs
Plasma Grenades
Haywire Grenades
10 Incubi Retinue
Torm. Hl. & Punisher (x10); Plasma Grenades
1 Raider
Dark Lance; Horrorfex
3 Raider Squads (Troops)
Warriors
- Splinter Rifle (x3); Splinter Cannon (x1); Blaster (x1)
1 Raider
- Dark Lance; Horrorfex
1 Ravager (Heavy Support)
- Disintegrator (x3)
2 Talos (Heavy Support)
Deployment
I won the roll for deployment and opted to go first, I deployed towards the middle of my DZ, placing Sniper Squad 1 near an objective in a forested hill on my left and Sniper Squad 2 near an objective on a large plateau on the right. Between them sat the Warrior Squad. The Archon and RJB unit were deployed behind Sniper Squad 1's hill. Ravager 1 was at the rearward base of the hill, between Sniper Squad 1 and the Warrior Squad, while Ravager 2 was located behind the large hill that Sniper Squad 2 occupied, along with the Wych Raider and the Raider Squad. The last Ravager was placed on my right flank, behind a building
My opponent placed his entire force behind a forested hill in the center of his DZ, flanked by the Talos with 2 Raider Squads blocking line of sight to the other Raiders and Ravager packed in behind them.
My Turn 1

Moving
The RJB's boosted along the extreme left flank, ending their move behind a forested hill. The Warrior Squad moved forward cautiously, backed up by Ravager 1 which moved up 12". Ravager 2 moved forward 12" to hover in front of Sniper Squad 2 on their hill, while Ravager 3 moved forward 6" out from behind the building. The Raider Squad moved up 12", heading for the nearest objective, located in front of my opponent's DZ. Both Sniper Squads sat still, as did the Archon and Wych Raiders.
Shooting
Despite the full complement of Dark Lance, Heavy and Light Disentegrator fire poured into the mass of enemy Raiders, I only managed to down a single Raider; The Dracon Raider was shaken, his lone Ravager was stunned, and a single wound was taken off the Talos that was lined up against my left flank. The Warriors waited until the Raider was downed to open up on the pinned enemy Warriors, killing several with their Splinter Cannons.
Assault
No assaults this turn, but the RJB adjusted their position along the left flank.
Opponent's Turn 1
Moving
The foremost Raider on his right side moved across his deployment to provide cover for the pinned Warriors. The other vehicles that could still move inched forward, but seemed hesitant. A second Raiders on [his right, my left] was destroyed by a scattering blast from a Disentegrator, killing almost half the Warrior squad on board. The two Taloi surged forward, but rolled poorly in their attempts to fleet/run.
Shooting
The enemy's return fire downed my Raider Squad with a lance shot (note the flaming wreckage template in front of Sniper Squad 2's hill), and the survivors were quickly picked off. Another lance to Ravager 1 (Between Warrior Squad and Sniper Squad 1) disabled its dark lance. The rest of his shooting was largely ineffectual.
Assault
No assaults
My Turn 2

Moving
The RJB's move to the small hill near the objective and leftmost enemy Talos. Ravager 1 and the Warrior squad stay put, having plenty of targets in range. The other two Ravagers move forward 6". The Archon's Raider moves 12" over Sniper Squad 1's hill and sit on the objective just outside my DZ. The Wych Raider shifts out from behind cover to draw a bead on the rightmost Talos with its lance. The Sniper Squads maintain their positions.
Shooting
Not a great round of shooting, due in large part to my opponent's ability to make a ridiculous number of cover saves. The RJB's are somehow just outside of Blaster range and can't fire on the nearby Talos. Additionally, only one of the many lance shots in its direction managed to score a second wound - proving it's worth a fire magnet. Some other shooting from on the opposite side of the field managed to stun a Raider while the Warrior Squad picked off a few more of the downed Warriors from the first turn. Talos 2 takes a wound.
Assault
No assaults, but the RJB's advanced upon the Talos, putting them within the threat of assault - depending on my opponent's fleet/run roll.
Opponent's Turn 2
Moving
The Talos takes the bait and moves over difficult terrain, headed for the RJB's. The Warriors move up to support it, taking them closer to the objective in that quadrant. The Archon's Red Raider zooms forward 12" with the Ravager following close by. The second Talos moves up on the my right flank Ravager. The Dracon's Raider finally decides to move up opposite the Archon, while the remaining Raider continues to meander around the wreckage of the Raider from turn 1, as the survivors move into cover around the nearby objective.
Shooting
His Ravager manages to immobilize Ravager 1 beside the Warrior Squad, leaving it with two functional Disentegrators. A volley of lances annihilates Ravager 3 along my right flank. A few more Warriors are picked off from the middle.
Assault
Talos 1 reaches assault with and kills two of the RJB's, leaving the lone survivor to flees back towards his table edge as it consolidates towards the downed Ravager 1. Talos 2 assaults Ravager 2, but only succeeds in shaking it.
My Turn 3

Moving
The Archon's Raider moves up behind Talos 1, roughly where the RJB's made their stand. The Wych Raider moves up to the edge of the hill where the enemy Warriors are holding an objective and disembarks. Ravager 2 retreats from Talos 2, taking up a position behind the Warrior squad.
Shooting
Talos 1 is largely ignored, while shots are poured into Talos 2, only managing to score a second wound on it. The Wyches thin out the Warrior squad holding the objective with their Splinter Pistols and Blaster. Fortunately, the Archon's Raider is taken down and a few casualties a taken in the unit. Unfortunately, my opponent continues to make the majority of his cover and armor saves.
Assault
The Wyches assault the remainder of the Warrior squad, using their Plasma Grenades to negate their cover. The Warriors are slaughtered and the Wyches consolidate into cover around the objective.
Opponent's Turn 3
Moving
The remaining Raider with its squad of Warriors move up to unleash splintery heck on the Wyches. Talos 1 creeps 6" towards the downed Ravager 1. The Dracon's Raider dashes across the center of the table, as the Archon and his retinue slog across on foot. Talos 2 remains in contact with the shaken Ravager 3. The enemy Ravager falls back to cover the Warriors who are holding an objective and staring down the Archon's Raider.
Shooting
My Warrior squad is nearly cut in half by shooting, mainly from the Ravager. The Raider Squad pours fire into the Wyches, but cover saves prevent them from being wiped out entirely. My Archon's Raider is stunned, but otherwise unharmed.
Assault
The opposing Archon and Incubi charge the remnant of the Warrior squad and crush it - leaving a lone survivor scrambling for a table edge. They consolidate towards the forest where Sniper Squad 1 is hiding. Talos 2 attempts to destroyRavager 2, but can't seem to connect.
My Turn 4

Moving
Sniper Squad 1 surges forward to claim the objective sitting just forward of the forested hill they've been hiding in while Sniper Squad 2 rushes forward to surround the objective in front of them. The Archon's Raider slides on to the small hill beside it before disembarking. Ravager 2 continues to make a tactical withdrawl, ending up in nearly the same position it started the game. The Wyches shift around in the cover, anticipating that they will either charge this turn or be wiped out by shooting shortly after, while their Raider maneuvers deep into enemy territory and flanks the Ravager. The fleeing RJB and Warrior continue their headlong flight off the table.
Shooting
Finally getting our targeting matrices aligned, Talos 2 is taken down by lance fire. The Wyches also manage to take down the Raider closest to them with a Blaster, taking some Warriors out in the ensuing wreck (and pinning them, I think) - My opponent attempts to deploys them on the opposite side of the wreckage from the Wyches. The Wych Raider sends a beam of dark matter into the rear of the enemy Ravager, stunning it. Ravager 2 lays waste to the Archon and his Incubi with its Disentegrators, but can't quite wipe them out.
Assault
My Archon and his Incubi charge and make short work of the Warriors holding an objective. They consolidate around the objective.
Opponent's Turn 4
Moving
The Dracon and his Incubi disembark at the foot of the hill by Sniper Squad 2. The Archon and a surviving Incubi (or two), attempt to move into the forest towards Sniper Squad 1, but poor difficult terrain tests frustrate their movement. Talos 1 casually floats up to the immobilized Ravager 1, claws twitching greedily.
Shooting
The Dracon and her retinue take pot shots at Sniper Squad 2 while her Raider blows Ravager 2 out of the sky.
Assault
The Dracon and Incubi charge Sniper Squad 2, slaughtering most of the them, but the survivors refuse to back down. Talos 1 wails on the Ravager 1, but can't seem to do anything to it that hasn't already been done.
 End of Turn 4.
 Somewhere around this point, another player made the smart alec comment:
"Hey the DE are finally going to win a game!"
I gave him the stink eye.
My Turn 5
Moving
The Wyches move out of cover to face the Warriors hiding behind their downed Raider.
Shooting
Sniper Squad 1 finally FINALLY takes down Talos 1. The Splinter Pistols and a Blaster of the Wyches trim the ranks of the Warriors. A couple shots aimed at the Ravager keep it unable to fire, IIRC - that or the Archon's Raider blew up the Dracon's Raider (I really need to remember to get the end game pics)
Assault
The Wyches charge and overrun the Warriors contesting the objective - they consolidate towards the Dracon and Incubi, who finishes off Sniper Squad 2 and consolidates around the objective.
Opponent's Turn 5
Moving
The Archon and Incubi try to move through the forest, but can't get within striking distance of Sniper Squad 1 - the only scoring unit left on the table.
Shooting
n/a
Assault
n/a
At this point, my opponent rolled to see if the game would continue and got a 1. I was firmly in possession of 1 objective, and contesting 2 others. My opponent was contesting 1 objective. I win!
Sorry, no pic for Turn 5
Thursday, October 15, 2009
40K: Wrecked Vehicle Tokens
First off, all credit for this goes to John from Santa Cruz Warhammer for coming up with this.

Take some flicker LED tealights, some cotton balls, and a hot glue gun mix them together and add a little black spray paint and - voila! - you've got something every Dark Eldar player needs a fair amount of: flaming wrecked vehicle tokens!

I was a little stingy with the final coat of spraypaint on the smoke, fearing that it would block out the light. As you can see below, plenty of light still makes it through, even in a well lit room:

I think I'm going to hit them with another pass . . . if it ever stops raining.
One thing I learned in making these: If, like me, you are using a low-temp hot glue gun, pre-fluff your cotton balls and put the glue on only one half of the light at a time, immediately applying the cotton right after. This helps to get the cotton on the light while the glue is still warm and tacky. Taking time to apply it to the whole light lets a lot of the heat dissipate and you loose some of the adhesion.
I'm hoping to break them out tonight in a game. I'm excited to see how other players react.
Take some flicker LED tealights, some cotton balls, and a hot glue gun mix them together and add a little black spray paint and - voila! - you've got something every Dark Eldar player needs a fair amount of: flaming wrecked vehicle tokens!
I was a little stingy with the final coat of spraypaint on the smoke, fearing that it would block out the light. As you can see below, plenty of light still makes it through, even in a well lit room:
I think I'm going to hit them with another pass . . . if it ever stops raining.
One thing I learned in making these: If, like me, you are using a low-temp hot glue gun, pre-fluff your cotton balls and put the glue on only one half of the light at a time, immediately applying the cotton right after. This helps to get the cotton on the light while the glue is still warm and tacky. Taking time to apply it to the whole light lets a lot of the heat dissipate and you loose some of the adhesion.
I'm hoping to break them out tonight in a game. I'm excited to see how other players react.
Monday, October 12, 2009
DnD: Encounter Quick Reference - First Draft
Here is my first stab at an Encounter Quick Reference Sheet done in the same vein as the editable & printer-friendly Skill Challenge Tracker. The intent is to make this into an editable pdf file, but before I start adding input fields, I need to finalize exactly what's going to show up and where.
I envision this as an aid to building encounters, but also helping streamline their execution when the PC's are wailing on the monsters - the DM can just glance down at the various defenses and tell if it was hit or not instead of having to look each one up.
Feedback is not only welcome, but encouraged for this one!

Thursday, October 1, 2009
40K: Aborted 40K Flash Game
Several years ago, as I was getting back into Warhammer 40,000 after an extended hiatus, I encountered a flash-animated battle report that I thought was so cool - I just had to try doing something like it.
As I began playing around with Flash and learning more about it, I thought 'Why stop at a battle report? Why not just make a game?' So I started working on a 40k Flash game during the abundance of downtime I had at my job at the time. The story was about a Dark Eldar Talos that had been captured and deactivated by Space Marines, only to be remotely reactivated by a Haemonculus to fight its way past the Marines and even, due to classic True Kin backstabbing, Dark Eldar forces.
I didn't get too far into it before I changed jobs twice within two or three years and could no longer focus on it. I still think about it from time-to-time.
So, having dug it up and dusted it off, here are the animations for the Talos:
As you can see, I never quite perfected getting the shooting and assault animations to run at the last position & heading of the figure.
I also have animations for a Dark Eldar Warrior w/Splinter Rifle, Tactical Space Marine w/Bolter, and a Space Marine Sergeant w/Bolt Pistol and Chainsword - maybe I'll put them up, provided anyone is interested in seeing them.
As I began playing around with Flash and learning more about it, I thought 'Why stop at a battle report? Why not just make a game?' So I started working on a 40k Flash game during the abundance of downtime I had at my job at the time. The story was about a Dark Eldar Talos that had been captured and deactivated by Space Marines, only to be remotely reactivated by a Haemonculus to fight its way past the Marines and even, due to classic True Kin backstabbing, Dark Eldar forces.
I didn't get too far into it before I changed jobs twice within two or three years and could no longer focus on it. I still think about it from time-to-time.
So, having dug it up and dusted it off, here are the animations for the Talos:
 Click to run the file
As you can see, I never quite perfected getting the shooting and assault animations to run at the last position & heading of the figure.
I also have animations for a Dark Eldar Warrior w/Splinter Rifle, Tactical Space Marine w/Bolter, and a Space Marine Sergeant w/Bolt Pistol and Chainsword - maybe I'll put them up, provided anyone is interested in seeing them.
Thursday, September 24, 2009
Art, Design: Binary Runes
Never thought I'd be designing a font, but here we are:
The set, which I've been referring to as Binary Runes, are inspired primarily by the Elder Futhark runes.
The next step is to turn these collections of shapes into 'simple' outlines and export them into a font editor. Right now, I'm thinking of trying the 30-day free trial of FontLab Studio. There is no way I can afford $650, though.
The real questions come after the font is created: Should I license it? What kind of license/how restrictive? How much is a font worth? Would anyone pay for it in the first place? Can a designer realistically expect his first solo effort to be worth anything?
I'm certainly not trying to restrict it's use - rather, I just want to make sure credit is given where appropriate. I won't lie, though: The idea of having something people are willing to pay for (even if it's no more than $1) gives me warm fuzzies.
I wonder if Nate Peikos (comic letterer extraordinaire and creator of the awesome Atland webcomic) would be willing to take an email on the subject . . . ?
Monday, September 21, 2009
DnD: Maiden Voyage of the Digital Game Table
After a long summer packed full of vacations, weddings, conferences and the always-hectic start of a new semester, our group was finally able to get together Saturday evening for the official debut of the Digital Game Table. As I was out getting groceries for the evening's meal (we all have dinner together on game nights), I happened across what I felt was a DM-worthy vessel for my gaming grog of choice:
 $3 at Wal-mart. Elixir of Dew sold separately
 Homemade salsa, apple slices, sliced cheese n' crackers!
Eventually, we identified one of the issues as having two different versions of MapTools installed. We got the latest version installed on both machines, but still could not connect via the server - possibly due to some of the default Vista security settings on my laptop, now that I think about it. We were finally able to connect using a Direct Connection, fortunately, and get the game started.
 Now that we have a better sense of lighting and accurate line of sight, who wants to go down the Scary Hall of Imminent Doom first?
 This was about the 4th time the Wiimote slipped down . . .
Taping and re-taping was a temporary fix at best, and the constant need to re-calibrate really killed the momentum of the game.
 . . . and this was somewhere around the 8th.
3/4 of the way through the evening, I finally get the bright idea to tape the wrist strap to the top edge of the projector, instead of trying to tape the Wiimote itself flat against it. This was a huge improvement and only required two or three narrow strips of duct tape, as opposed to the wads I was wasting before.
 Best move anyone made during the entire session
After all that, the party finally arrived at the climactic showdown they'd been working towards for so long . . . and made it through one round of combat (10 crawling claws, 2 Bonewretch Skeletons, 4 Decrepit Skeletons and 2 Skeleton Archers being led by a Deathmaster Deathlock Wight are a lot to wade through in a turn). The good thing about using MapTools (and Trackwork) is that I can save things right where we left them and be ready to go for next time.
I'm really excited for our next session. We got over all the technical hurdles *knock on wood* and, during the course of the evening, figured out the best way to position and attach the Wiimote to the projector. So next session, we should be able to jump right into an action packed encounter and have a smooth integrated gaming experience, rather than the experience of wrangling the hardware and software to play a game.

I'm not sure if the others were as excited about using the table as I was, but they really stepped things up a notch with the snacks - and this was after we'd already had dinner, complete with ice cream and grape pie.
Having already spent a good deal of time earlier in the day trying to find the best position in which to tape the Wiimote to the projector, I had hoped that getting everything set up and running would not take long at all. Unfortunately, I did not anticipate the connection issues between my new laptop and the older one my friend brought to serve as the player client (the one that is hooked up to the projector).
Eventually, we identified one of the issues as having two different versions of MapTools installed. We got the latest version installed on both machines, but still could not connect via the server - possibly due to some of the default Vista security settings on my laptop, now that I think about it. We were finally able to connect using a Direct Connection, fortunately, and get the game started.
This was a learning experience on so many levels - one of which was figuring out how the party should move on a map outside of an encounter. Even a short walk down a hallway can take a long time when everybody moves one at a time. In the future, I think we will try having the group selected and moved as one until they see/hear/perceive something that, at which point they can choose maneuver individually.
This was also the point at which we realized the Wiimote was slipping out of position. Things would be going fine, then, suddenly, the calibration would become skewed. We wound up connecting a wireless mouse for 'back-up' and having the wheel really made zooming in and out easier for the players - but everyone was still determined to use the pen as much as possible.
This was also the point at which we realized the Wiimote was slipping out of position. Things would be going fine, then, suddenly, the calibration would become skewed. We wound up connecting a wireless mouse for 'back-up' and having the wheel really made zooming in and out easier for the players - but everyone was still determined to use the pen as much as possible.
Taping and re-taping was a temporary fix at best, and the constant need to re-calibrate really killed the momentum of the game.
3/4 of the way through the evening, I finally get the bright idea to tape the wrist strap to the top edge of the projector, instead of trying to tape the Wiimote itself flat against it. This was a huge improvement and only required two or three narrow strips of duct tape, as opposed to the wads I was wasting before.
After all that, the party finally arrived at the climactic showdown they'd been working towards for so long . . . and made it through one round of combat (10 crawling claws, 2 Bonewretch Skeletons, 4 Decrepit Skeletons and 2 Skeleton Archers being led by a Deathmaster Deathlock Wight are a lot to wade through in a turn). The good thing about using MapTools (and Trackwork) is that I can save things right where we left them and be ready to go for next time.
I'm really excited for our next session. We got over all the technical hurdles *knock on wood* and, during the course of the evening, figured out the best way to position and attach the Wiimote to the projector. So next session, we should be able to jump right into an action packed encounter and have a smooth integrated gaming experience, rather than the experience of wrangling the hardware and software to play a game.
Thursday, September 17, 2009
DnD, Art: Forgegrinder's Runes
It can be fun when hobbies and disciplines mix - in this case: graphic design, typography and arcane dwarven metalworking.
This is result of working on some expanded content for Nevermet Press, here are some of the runes Rendersson Forgegrinder used to create his sentinels. It's a mash-up of several real world sources, with some personal touches thrown in.
Maybe, at some point in the future, I'll produce a font based on this. Are there any good freeware font editor/creators available?

Monday, September 14, 2009
DnD: Editable Skill Challenge Tracker
The Skill Challenge Tracker is now available as an editable pdf! Same look and printability as in the previous post.
Skill_Challenge_Tracker.pdf (1.20 MB, Mediafire)
As always, feedback and constructive criticism are welcome - enjoy!
Skill_Challenge_Tracker.pdf (1.20 MB, Mediafire)
As always, feedback and constructive criticism are welcome - enjoy!
Tuesday, September 8, 2009
DnD: Revised Skill Challenge Tracker - Print Version
After getting some excellent feedback via both Twitter and ENWorld.org, here is the revised Skill Challenge Tracker:
It is now a full 8.5" x 11" and more printer friendly (less areas of solid black). Additionally, there is now a place to visually keep track of successes and failures as well as extra room for notes, etc.
Assuming I don't receive any further groundbreaking feedback, I will begin converting this into a pdf with editable fields. I hope to have this completed by the end of the week, but no promises.
Enjoy!
Wednesday, September 2, 2009
DnD: Skill Challenge Tracker - Sneak Peak
I need feedback!
This is a picture of the Skill Challenge Tracker (originally referred to as a 'template,' but I think 'tracker' is more accurate in this instance) to which I'm preparing to add editable fields - much the same as the Editable Monster Card Template. In fact, it will have the same size (4"x6") and printability as the Monster Card Template
I need to know from DM's what works, what doesn't, what needs added, what needs dropped, and what needs more explanation (assuming it will fit).
Based on a suggestion from IllusiveDreams (Twitter), here is what the Tracker might look like in use (based on the Negotiation skill challenge in the DMG):
 Complexity and DC will be dropdowns; Pri(mary), Sec(ondary), Blk (Blocked), and Auto-Fail will be checkboxes; the remaining fields will be text boxes.
This is a picture of the Skill Challenge Tracker (originally referred to as a 'template,' but I think 'tracker' is more accurate in this instance) to which I'm preparing to add editable fields - much the same as the Editable Monster Card Template. In fact, it will have the same size (4"x6") and printability as the Monster Card Template
I need to know from DM's what works, what doesn't, what needs added, what needs dropped, and what needs more explanation (assuming it will fit).
Based on a suggestion from IllusiveDreams (Twitter), here is what the Tracker might look like in use (based on the Negotiation skill challenge in the DMG):
Friday, August 28, 2009
40K: Updated Dark Eldar List
Based on some feedback I've gotten, I have decided to tweak my all-comers list a little bit and throw in a unit I have models for, but have yet to actually put on the table: Reaver Jetbikes.
1 Archon (HQ)
Punisher
Shadow Field
Combat Drugs
Plasma Grenades
Animus Vitae
Tormentor Helm
6 Incubi Retinue
Torm. Hl. & Punisher (x5); Blaster (x1); Plasma Grenades
1 Raider
Dark Lance
9 Wyches (Elites)
Splinter P. & CCW (x8); Blaster (x1); Plasma Grenades; Wych Weapons
1 Succubus
Agoniser (x1); Splinter Pistol (x1); Plasma Grenades; Wych Weapons
1 Raider
Dark Lance
5 Raider Squad (Troops)
Splinter Rifle (x3); Splinter Cannon (x1); Blaster (x1)
1 Raider
Dark Lance
Horrorfex
14 Warriors (Troops)
Splinter Rifle (x10); Splinter Cannon (x2); Blaster (x2)
10 Warriors (Troops)
Splinter Rifle (x8); Dark Lance (x2)
10 Warriors (Troops)
Splinter Rifle (x8); Dark Lance (x2)
3 Reaver Jetbikes (Fast Attack)
Splinter Pistol; Splinter Rifle (x1); Blaster (x2)
3 Ravagers (Heavy Support)
Dark Lance (x1); Disintegrator (x2)
Models in Army: 65
Total Army Cost: 1500
Got an opinion or some advice? Let me know!
Wednesday, August 26, 2009
Art: Two More Drawings for Nevermet Press
I'm so disorganized this week. Last Friday, an article went up on Nevermet Press which I provided illustrations for:


I'm hoping to have a new laptop within the next week or two and begin work on a new painting shortly thereafter. Knowing how slow I can be, however, I fear I won't have it finished before the character associated with it gets posted. I guess we'll see.
I'm hoping to have a new laptop within the next week or two and begin work on a new painting shortly thereafter. Knowing how slow I can be, however, I fear I won't have it finished before the character associated with it gets posted. I guess we'll see.
Friday, August 21, 2009
DnD: Perilous Procession - Collected Links
Here are the links to each of the Perilous Procession articles, for your convenience:
I'm considering designing some Combat Encounters (maps and all) that could result from failed Skill Challenges - if there is any interest in that sort of thing.
I'm considering designing some Combat Encounters (maps and all) that could result from failed Skill Challenges - if there is any interest in that sort of thing.
Wednesday, August 19, 2009
DnD: Editable Monster Card Template
Here it is! (425 KB .pdf, Mediafire)
The editable Monster Card Template looks like this (fields are highlighted):
 Use it, abuse it, and let me know how to improve it (without infringing on copyrights or breaking any laws :-S). Enjoy!
The editable Monster Card Template looks like this (fields are highlighted):
Use it, abuse it, and let me know how to improve it (without infringing on copyrights or breaking any laws :-S). Enjoy!
Monday, August 17, 2009
DnD: Perilous Procession #5 - Gain Entrance
Wow, here we are at the end of my very first set of skill challenges! For some reason, I thought I had six challenges for this, but it turns out there were only five. So, presented here for your enjoyment, the final chapter of the Perilous Procession:
#5 - Gain Entrance
The PC's have decided to use the caravan as a means of gaining entrance to a fortified city or town they might otherwise not have access to (as opposed to trying to force their way in or sneaking in by some other route). However, the guards have been warned to be on the lookout for a group of adventurers trying to sneak past them and are wary of anyone trying to gain access to the city.
Encounter Level
PC Level + 2
Complexity
2 (6 successes before 3 failures)
Primary Skills
Success - the caravan is allowed inside the city walls
Failure - the caravan (along w/the PC's) is refused entrance, caravan annoyed with PC's
Critical Failure (less than 50% overall success before failure) - the ruse is discovered and the PC's are attacked/captured
#5 - Gain Entrance
The PC's have decided to use the caravan as a means of gaining entrance to a fortified city or town they might otherwise not have access to (as opposed to trying to force their way in or sneaking in by some other route). However, the guards have been warned to be on the lookout for a group of adventurers trying to sneak past them and are wary of anyone trying to gain access to the city.
Encounter Level
PC Level + 2
Complexity
2 (6 successes before 3 failures)
Primary Skills
- Bluff (Hard DC)
Do you want to be the one to go before the city council and explain that their harvest festival was ruined because you didn't like the way a couple of farmers were dressed?- After first failure, subsequent uses of this skill auto-fail for that PC, -2 for other PCs to use
- After first failure, subsequent uses of this skill auto-fail for that PC, -2 for other PCs to use
- Diplomacy (Easy DC)
In a perfect world we would all be walking around with three forms of official documentation. I'm willing to bet that you yourself have less than that on your person. What I do have is a desire to see your fair city, boost the local economy and carry abroad tales of an enjoyable visit. - Insight (Moderate DC)
I can tell you really don't enjoy wasting your day standing around out here. How 'bout we buy you a drink when your shift is over? - Intimidation (Hard DC)
I suggest you let us through. Our oxen have been known to get spooked by unwarranted searches and I'd hate for you to get trampled.- After first failure, subsequent uses of this skill auto-fail for that PC, -2 for other PCs to use
- After first failure, subsequent uses of this skill auto-fail for that PC, -2 for other PCs to use
- Streetwise (Moderate DC)
Look, Devlan, is it? I happen to know that you're tight with a close acquaintance of mine. A certain merchant of hard-to-procure items and experiences? Ask him, he'll vouch for me. I might even convince him to give you a deal.
Success - the caravan is allowed inside the city walls
Failure - the caravan (along w/the PC's) is refused entrance, caravan annoyed with PC's
Critical Failure (less than 50% overall success before failure) - the ruse is discovered and the PC's are attacked/captured
Thursday, August 13, 2009
40K: Crates, a Step-by-Step Tutorial
They're simple to make, they work in either a fantasy or (depending on how you paint them up) a sci-fi setting, they can serve as either an objective or simple cover - they're crates!
I've been meaning to get this post up for a while now, but other things kept popping up. I lost my motivation to work on the blank pdf form, however, and decided to use that creative 'downtime' to finish something for once.
Materials used
Step 1: Marking the block with 1/8" lines. Why 1/8"? Well, a 2 x 4 is actually only 3.5" wide - approximately the width of my hand (not counting the thumb). On an average Space Marine - which is what I base all my terrain measurements on - the width of the hand is 1/8". Thus, the width of a 2 x 4 on the 40k scale is 1/8". Additionally, be sure that the lines run continuously around the block, then put perpendicular lines on the top and bottom - rather than having the lines on each face run in its own direction.
Step 2: Use the saw to cut a groove on each of the lines. Trying to get the groove started can be tricky (watch your fingers!), but don't worry if it's not perfect or one of your cuts jumps off the line. Slight imperfections actually make it look more realistic, in my opinion. The toothbrush is perfect for cleaning the sawdust out of the grooves.
Step 3: Measure and mark the coffee stirrer. You won't need the rounded ends for this.
Step 4: Cut the stirrer. I found that, instead of trying to cut (across the grain) all the way through the stirrer, it worked better if I scored it deeply (about 1/2 through) then bend and broke the pieces off. The exception to this being the long cut along the grain to split the stirrer into two long 1/8" pieces. This is the step I was most likely to screw up on.
Step 5: If you cut like me, one of the two long pieces will be wider than the other. Take the wider piece and measure out and then score and break off four 1" long pieces.
Step 6: Glue these 1" pieces to the corners of the block. Be sure to place it so that half the with of the segment overhangs (1/16" or the approximate width of the coffee stirrer).
Step 6b: This is an 'in process' shot to show my approach to getting the right amount of overhang: set the block up on two other coffee stirrers for the proper depth, then use a couple other blocks to keep the pieces being glued in place.
Step 7: Measure, score and break off four more 1" pieces from the remaining long piece. Glue them to the opposite corners, filling in the overhang.
Steps 8 and 9: Measure, score and cut the horizontal pieces to fit between the vertical ones. For some reason, I kept cutting these short the first time I did this.
Step 10: Measure, score and cut two 1" pieces for both the top and bottom of the crate. Glue them into place.
Step 11: The remainder of the procedure should be pretty obvious by now.

You might save time by not cutting grooves into the bottom of the crate. Personally, I put all the grooves in - that way, if one side is uglier than the others, I can simply keep that one faced down. You may also want a couple different symbols or insignia on each side, so that having the crate turned a certain way can serve different purposes for different situations.
I've not painted my crates yet, but I have plans for an up arrow and an Imperial aquilla. I'd love to see what anybody reading this comes up with!
I've been meaning to get this post up for a while now, but other things kept popping up. I lost my motivation to work on the blank pdf form, however, and decided to use that creative 'downtime' to finish something for once.
Materials used
- 1" wooden blocks from Michaels
- 1/4" wide wooden coffee stirrers (I got mine from Kroger's) - approx. 3 per crate
- white glue (Elmer's)
- X-acto knife
- Razor Saw (I have a Zona Razor Saw w/Mitre Box, very handy!)
- ruler
- old toothbrush (the most underrated tool in a hobbyist's arsenal)
 Step 1 |  |  Step 3 |
Step 1: Marking the block with 1/8" lines. Why 1/8"? Well, a 2 x 4 is actually only 3.5" wide - approximately the width of my hand (not counting the thumb). On an average Space Marine - which is what I base all my terrain measurements on - the width of the hand is 1/8". Thus, the width of a 2 x 4 on the 40k scale is 1/8". Additionally, be sure that the lines run continuously around the block, then put perpendicular lines on the top and bottom - rather than having the lines on each face run in its own direction.
Step 2: Use the saw to cut a groove on each of the lines. Trying to get the groove started can be tricky (watch your fingers!), but don't worry if it's not perfect or one of your cuts jumps off the line. Slight imperfections actually make it look more realistic, in my opinion. The toothbrush is perfect for cleaning the sawdust out of the grooves.
Step 3: Measure and mark the coffee stirrer. You won't need the rounded ends for this.
 Step 4 |  Step 5 |  Step 6 |
Step 4: Cut the stirrer. I found that, instead of trying to cut (across the grain) all the way through the stirrer, it worked better if I scored it deeply (about 1/2 through) then bend and broke the pieces off. The exception to this being the long cut along the grain to split the stirrer into two long 1/8" pieces. This is the step I was most likely to screw up on.
Step 5: If you cut like me, one of the two long pieces will be wider than the other. Take the wider piece and measure out and then score and break off four 1" long pieces.
Step 6: Glue these 1" pieces to the corners of the block. Be sure to place it so that half the with of the segment overhangs (1/16" or the approximate width of the coffee stirrer).
 Step 6b |  Step 7 |  Step 8 |
Step 6b: This is an 'in process' shot to show my approach to getting the right amount of overhang: set the block up on two other coffee stirrers for the proper depth, then use a couple other blocks to keep the pieces being glued in place.
Step 7: Measure, score and break off four more 1" pieces from the remaining long piece. Glue them to the opposite corners, filling in the overhang.
Steps 8 and 9: Measure, score and cut the horizontal pieces to fit between the vertical ones. For some reason, I kept cutting these short the first time I did this.
 Step 9 |  Step 10 |  Step 11 |
Step 10: Measure, score and cut two 1" pieces for both the top and bottom of the crate. Glue them into place.
Step 11: The remainder of the procedure should be pretty obvious by now.
You might save time by not cutting grooves into the bottom of the crate. Personally, I put all the grooves in - that way, if one side is uglier than the others, I can simply keep that one faced down. You may also want a couple different symbols or insignia on each side, so that having the crate turned a certain way can serve different purposes for different situations.
I've not painted my crates yet, but I have plans for an up arrow and an Imperial aquilla. I'd love to see what anybody reading this comes up with!
Subscribe to:
Posts (Atom)